Never Dry Again: The Best Cheesy BBQ Meatloaf Recipe & Tips
For too long, meatloaf has suffered from a bad reputation: dry, bland, and utterly uninspiring. But what if we told you that the classic comfort food could be transformed into a tender, juicy, and incredibly flavorful experience? Enter the BBQ meatloaf – a dish so satisfying, so packed with smoky BBQ goodness and melty cheese, that it might just change your mind about meatloaf forever. Forget everything you thought you knew, because we're about to dive into a recipe that guarantees a moist, diner-worthy result every single time. Get ready to discover the secrets to a truly unforgettable juicy BBQ meatloaf that will have your family asking for seconds.
The Secret to a Truly Juicy BBQ Meatloaf (and How to Avoid Dryness)
The number one complaint about meatloaf is dryness, but with a few simple techniques, you can ensure your BBQ meatloaf is consistently moist and tender. It all comes down to understanding the purpose of each ingredient and how to handle them.
- The Magic of Soaked Breadcrumbs: This is arguably the most critical step. Soaking panko or regular breadcrumbs in milk (2% or whole works perfectly) before adding them to your meat mixture is a game-changer. The breadcrumbs absorb the liquid, expanding and creating tiny pockets of moisture throughout the loaf. This prevents the meat from compacting too much during cooking, resulting in a lighter, more tender texture that truly lives up to its "juicy" promise.
- Choose Your Beef Wisely: The type of ground beef you use makes a significant difference. Opt for 80/20 ground beef (80% lean, 20% fat). The fat is essential for both flavor and moisture. Leaner beef, while seemingly healthier, will result in a drier, grainier meatloaf that lacks the richness you desire. The fat renders down during cooking, keeping the meat moist from within.
- Handle with Care: When mixing your meatloaf ingredients, be gentle. Overmixing is the enemy of tenderness. Just like with meatballs or burgers, overworking the meat develops the proteins, leading to a dense, tough texture. Mix just until everything is combined – a light touch is key.
- Sautéed Aromatics: Don't skip sautéing your onions and other veggies (like finely diced bell peppers or garlic) before adding them to the mixture. Cooking them first softens them and releases their natural moisture and sugars, which then get absorbed by the meatloaf during baking, adding depth of flavor and preventing raw onion crunch.
- Eggs as Binders and Moisturisers: Eggs serve a dual purpose: they act as a binder, holding the loaf together, and they contribute additional moisture. Don't be tempted to reduce the egg quantity, as it's crucial for both structure and tenderness.
Mastering the BBQ Meatloaf Glaze: Sweet, Tangy, and Irresistible
A great BBQ meatloaf isn't complete without a show-stopping glaze. This isn't just about adding flavor; the glaze caramelizes during baking, forming a beautiful, slightly sticky crust that seals in moisture and adds a fantastic textural contrast. The perfect glaze balances sweet, tangy, and a touch of savory.
While a good quality store-bought BBQ sauce is a perfect base, you can elevate it with a few simple additions:
- For Extra Sweetness and Depth: A spoonful of brown sugar, molasses, or even a touch of maple syrup.
- For Tang: A splash of apple cider vinegar or Worcestershire sauce can brighten the flavor profile.
- For Heat: A pinch of cayenne pepper, a dash of your favorite hot sauce, or a finely minced jalapeño (if you like a little kick).
- For Smokiness: A tiny drop of liquid smoke or smoked paprika can enhance the BBQ essence.
The key to a truly great glaze is the application technique. Apply half of your chosen glaze at the beginning of the baking process. This allows it to slowly cook into the meatloaf, infusing flavor. Then, about 15-25 minutes before the meatloaf is done, apply the remaining glaze. This second layer will caramelize beautifully without burning, creating that irresistible sticky-sweet finish.
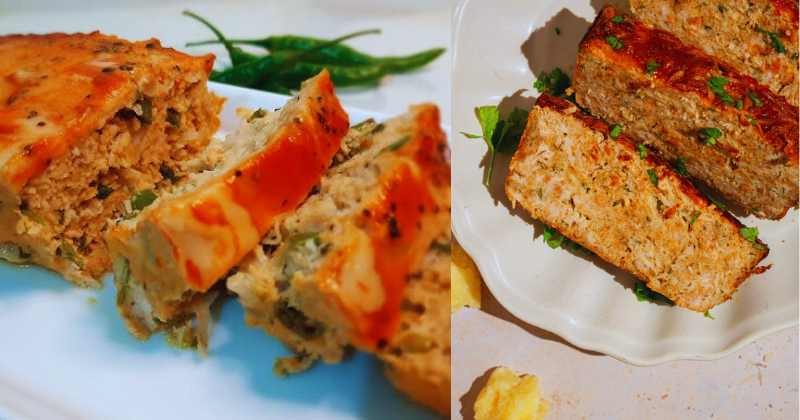
Ditch the Loaf Pan? Why Free-Form BBQ Meatloaf Reigns Supreme
If you've ever had a soggy-bottomed meatloaf, it's likely because of the loaf pan. While convenient for shaping, a loaf pan traps moisture, essentially steaming the sides and bottom of your meatloaf. This prevents those delicious caramelized edges and can lead to uneven cooking.
For a superior BBQ meatloaf, it's time to ditch the pan and go free-form! Here's why and how:
- Even Cooking & Crispier Edges: Baking your meatloaf on a rimmed baking sheet (lined with parchment paper or non-stick foil for easy cleanup) allows air to circulate around all sides. This promotes more even cooking and helps develop a wonderful, slightly crispy crust on the edges – something you just can't achieve in a loaf pan.
- No More Steaming: By allowing the sides to be exposed, moisture evaporates, preventing that undesirable steamed texture.
- Shaping Tips: When forming your loaf, aim for a narrow, elongated shape, slightly narrower than a standard loaf pan would produce. The meatloaf will spread a little during cooking, so starting narrower ensures it maintains a good shape without becoming too flat. Make sure to keep the height relatively consistent for even cooking.
Step-by-Step Guide to Your Best Cheesy BBQ Meatloaf
Ready to make the best cheesy BBQ meatloaf of your life? Here’s a detailed breakdown of the process:
Preparation is Key
- Soak the Panko: In a large bowl, combine your panko breadcrumbs with milk. Let it sit for 5-10 minutes until the breadcrumbs have fully absorbed the liquid and become soft.
- Sauté the Veggies: In a skillet, heat a little oil and sauté finely chopped onions (and any other desired aromatics like garlic or bell peppers) until softened and translucent. Let them cool slightly before adding to the meat mixture.
- Prep Your Cheese: Shred your favorite cheese (cheddar is fantastic here, but mozzarella or gouda also work well).
Mixing and Shaping
- Combine Ingredients: To the bowl with the soaked breadcrumbs, add your 80/20 ground beef, cooled sautéed veggies, eggs, shredded cheese, Worcestershire sauce, a dash of liquid smoke (if using), and your chosen seasonings (salt, pepper, onion powder, garlic powder, fresh or dried dill/parsley).
- Mix Gently: Using your hands, mix all the ingredients just until combined. Be careful not to overmix, as this will make your meatloaf tough.
- Shape the Loaf: Line a large rimmed baking sheet with parchment paper or non-stick foil. Transfer the meat mixture to the center and gently shape it into an even, narrow loaf.
Glaze and Bake
- First Glaze: Spoon about half of your prepared BBQ glaze evenly over the top and sides of the meatloaf.
- Initial Bake: Bake in a preheated oven at 350°F (175°C) for approximately 1 hour.
- Second Glaze & Final Bake: Remove the meatloaf from the oven. Spoon the remaining BBQ glaze over the top, ensuring good coverage. Return to the oven and bake for another 15-25 minutes, or until the internal temperature reaches 160°F (71°C) when measured with a meat thermometer. The glaze should be beautifully caramelized.
- Rest, Then Slice: This step is non-negotiable! Remove the meatloaf from the oven and let it rest for at least 10-15 minutes before slicing. Resting allows the juices to redistribute throughout the loaf, ensuring every slice is incredibly moist and prevents it from crumbling when cut. It's worth the wait!
Ingredient Deep Dive & Flavor Variations
Beyond the core recipe, there are endless ways to customize your BBQ meatloaf:
- Cheese Choices: While sharp cheddar offers a classic, robust flavor, consider pepper jack for a spicy kick, smoked gouda for extra depth, or even a mix of cheeses. You can also add a layer of cheese halfway through baking for an extra melty center.
- Herb Power: Fresh dill adds a wonderfully unique and bright note. Fresh parsley is another excellent choice for a touch of freshness. Dried herbs can be used in a pinch, but fresh always delivers more impact.
- Spice it Up: For heat lovers, finely minced jalapeños (seeds removed for less heat) can be added to the meat mixture. A dash of red pepper flakes or a hotter BBQ sauce will also do the trick.
- Lighter Options: If you're looking to reduce fat, ground turkey or chicken can be used. Just be mindful that leaner meats tend to be drier, so increase the moisture by adding extra sautéed vegetables, a little more milk to the breadcrumbs, or even some grated zucchini.
Perfect Pairings & Serving Suggestions
A hearty BBQ meatloaf deserves equally comforting sides. Classic pairings include:
- Creamy mashed potatoes (perfect for soaking up any extra glaze!).
- Roasted vegetables like asparagus, broccoli, or carrots.
- A side of homemade mac and cheese.
- For a lighter meal, a crisp green salad and some crusty bread.
- Don't forget classic BBQ sides like coleslaw or corn on the cob.
Make Ahead & Storage Tips
This BBQ meatloaf recipe is fantastic for meal prep:
- Make Ahead: You can assemble the meatloaf mixture, shape it, and place it on your lined baking sheet. Cover tightly with plastic wrap and refrigerate for up to 24 hours before baking.
- Leftovers: Store any leftover slices in an airtight container in the refrigerator for up to 4 days.
- Freezing: Cooked slices of BBQ meatloaf freeze beautifully for up to 3 months. Wrap individual slices tightly in plastic wrap, then aluminum foil, and place them in a freezer-safe bag.
- Reheating: For best results, reheat slices in the oven at 300°F (150°C) until warmed through, or in an air fryer for a crispier edge. A quick zap in the microwave is also an option, though it might compromise texture slightly.
Gone are the days of dry, uninspired meatloaf. With this comprehensive guide and a focus on moisture-locking techniques, you now have all the tools to create the most incredible, juicy, and cheesy BBQ meatloaf your taste buds have ever encountered. It’s a truly satisfying dish that brings comfort and big flavors to your table, proving that this classic can indeed be utterly delicious. So go ahead, fire up your oven, and prepare to never experience a dry meatloaf again!
